In this article, ItsmeIT will share practical examples of how to use the chmod command in Linux Debian or Ubuntu to manage permissions for files and directories, including read, write, and execute permissions. However, in Linux, without root or sudo privileges, users cannot delete, move, or modify files on the system. Therefore, we will demonstrate these operations with examples of permissions and operations on the system.

Use chmod command in Linux check folder permission and Owner
Linux is used not only for its reliability and security, but also for its multifunctionality, allowing to run VPS servers, work with multiple users, and many other applications. In this context, to learn how to determine the current permission status of a file or directory on a Linux system, we will approach two different methods.
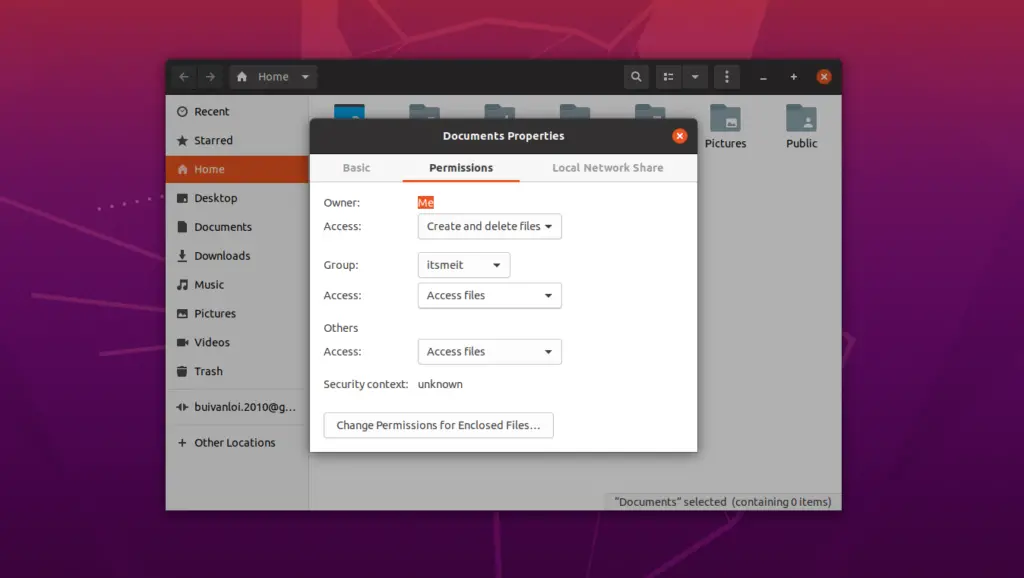
Method 1. Use GUI method to check permission
In Linux, using the graphical user interface method is the simplest way to check the details of a file. You can select the file and right-click to open the drop-down menu, then select -> Properties to open a new tab and view detailed information about that file.

Method 2. Use the command on the terminal to check (CLI)
To get information or permission status of a file or directory on a Linux system, you can use the command ls -l.
ls -l filename.zip

The result of the command ls -l will start with a dash (-) if the file is not a directory. The symbol “rw” in this case represents the read and write permissions of that file.
Another example of how to use chmod command on Ubuntu and Linux systems is as follows:
touch newfile.txt
chmod g+w newfile.txt
After creating a new file “newfile.txt” with the “touch” command, the “chmod g+w newfile.txt” command is used to grant write permission to the user group.

By using the command “ls -og newfile.txt”, we can see the file permission information displayed as -rw-rw-r--1. Where, “rw” denotes that the file has read and write permissions. The number “1” indicates that the file is a regular file, and not a directory or other type of file.
ls -og newfile.txt
Numeric symbols representing the permissions of the chmod command in Linux or Ubuntu:
- The number “0” indicates that no permission is granted to the user.
- The number “1” indicates that the user has execute permission to the file.
- The number “2” indicates that the user has write permission to the file.
- The number “3” denotes the user with write and execute permission to the file.
- The number “4” indicates that the user has read permission to the file.
- The number “5” denotes the user with read and execute permission to the file.
- The number “6” denotes the user with read and write permission to the file.
- The number “7” denotes the user with read, write, and execute permission to the file.
Use chmod command syntax and practical examples on terminal
In this section, we will learn about the syntax and examples of the chmod command Linux, in order to provide users with the necessary knowledge to use this command in everyday situations.
Here is a list of the Linux chmod command syntaxes and their meanings:
- u: refers to the user who owns the file or directory.
- g: refers to the group containing the file.
- o: refers to other users not mentioned in the u or g options.
- a: refers to all users, including the user, group, and other users.
- r: refers to read-only permissions for the file.
- w: refers to write permissions for the file.
- x: refers to execute permissions for the file.
- -: refers to no permission for the file.
These syntaxes will be used in real life examples to perform basic file and directory operations in Linux.
chmod 755;
In the cases where the chmod command is used in Linux and Ubuntu, there are two important syntaxes, chmod -R 755 and chmod 755. However, the difference between them is very important:
- When using the -R 775 syntax, all users are allowed to modify the entire directory.
- When using the 755 syntax, only the root user is allowed to read and write the file system.
chmod -R 755;
The chmod command in Linux with 755 permissions allows the user to have read, write, and execute permissions to the file. Meanwhile, other users only have permission to read and execute that file. If you want to change the permissions of the entire directory, you can use the command chmod -R 755. This allows the user and group to read, write, and execute all files in that directory.
mkdir itsmeit
sudo chmod -R 755 itsmeit
ls -l
drwxr-xr-x 2 itsmeit itsmeit  4096 Thg 12 29 16:47 itsmeit
You can see that the log-list output (ls -l) has changed the read, write and execute permissions for the directory.
chmod 777;
To use the chmod command in Ubuntu and Linux with 777 permissions, you can type “chmod 777 <filename>” on the terminal. This command allows all users to read, write, and execute the file. Note that using the 777 permission can jeopardize your security system if not used carefully. The chmod commands in Linux are related to the file system and can be used to change the permissions for users and their groups on files and directories.
sudo chmod -R 777 itsmeit/

After executing the command “ls -l” on Linux, you will see an output similar to “drwxr-xr-x 2 user group 4096 May 6 14:30 folder”. Where, “dr” stands for “directory”, and then the characters “wxr” denote the access rights of users (users), groups (groups) and other users ( other), where “w” is write, “x” is execute, and “r” is read. Finally, the numeric value “2” indicates that there are two objects associated with that directory and they both have read, write, and execute permissions to all files and directories within.
chmod 700;
If you are the owner of your Linux system but cannot write or execute a specific file, it may be because you do not have the right permissions. The Linux file system works differently than Windows or other operating systems, the chmod command in Linux will help you manage file and folder permissions to make sure you know what you’re doing.
For that reason, if you want to grant other users the permission to execute a particular file on your Linux system, you can use the chmod 700 command. Here is an example using the chmod command in Ubuntu & Linux to better understand how this command works.
ls -l /etc/hosts

sudo chmod 700 /etc/hosts
chmod: changing permissions of '/etc/hosts': Operation not permitted
Looking at the screenshot, you can see that the chmod command in Linux with permission 700 is run as the root user, and you can’t see the long-listed output (ls -l) without root privileges. Also, it reported an error: “Operation not permitted”.
chmod 666;
As a sysadmin, ItsmeIT finds the chmod 666 command very useful in situations involving remote working between different systems. What’s particularly interesting about this command is that it has the ability to disable the execute permission of files or directories for all users and only allow the user to read and write files.
An example using the chmod command in Linux or Ubuntu to convert a file permission to 666:
chmod -c 666 newfile.txt
mode of 'newfile.txt' changed from 0700 (rwx------) to 0666 (rw-rw-rw-)
chmod 644;
If you are a sysadmin or owner of a local FTP server, you can use the chmod 644 command in Ubuntu & Linux to set a rule that allows users or visitors to view and download files, while still protecting your files from unauthorized modification. This command can be used on any file system, server, or Linux media player server like Plex or Emby. Here is an example of how to use chmod 644 command on Linux.
chmod 644 newfile.txt

chmod 600;
Assuming you work for a company on a local network server to share documents or files with your colleagues, you may not want to allow them to delete any files from your personal folder. To solve this problem, you can use the chmod command in Linux with permission 600. This command allows other users to read and write files and directories, but not delete or execute. This ensures that only you can execute files from your system in a chmod 600 protected.
chmod 600 newfile.txt

chmod +x;
A command chmod +x is a command in Linux used to grant execute permission to an executable file or program. By using the command chmod +x, a user can grant execute permission to all users on system.
Specifically, the “x” in “chmod +x” represents the execute permission. The “+” sign indicates that new permissions will be added to the existing file or directory permissions, and “chmod” is the Linux command to change the permissions of a file or directory.

For example, to install the install.sh file, you can use the command “chmod +x install.sh” to grant execute permission to that file. You can then run the install.sh file with the “./install.sh” command to start the installation process. This Linux chmod command ensures that you have sufficient permissions to run the file install.sh on your system and install the application successfully.
chmod +x install.sh
Another example and note when using the command “chmod +x”:
In case you use the “chmod +x” command with superuser (sudo) privileges without specifying the target file or folder, it may result in granting execute permission to all files and directories across your operating system. The ‘chmod’ command in Linux with the ‘+x’ option is highly dangerous, as it can potentially allow various files and directories to be executed with root privileges, introducing security vulnerabilities and risking the overall system integrity.

For example, if you use the command “sudo chmod +x /”, this will grant execute permission to all files and folders in the system. Thereby it can allow attackers to execute illegal commands and cause serious damage. Therefore, you should always be careful and specify the files or folders that need permission when running the command “chmod +x” with permissions sudo.
The above is not all about how to use chmod command in Linux like Ubuntu or debian but with the above examples it will give you a look and how to use the chmod command more effectively. This will help you understand the chmod command better and manage file and folder permissions on your system more efficiently. If you need further assistance with the command, you can always open a terminal and run chmod --help for more information.
– Advertising –


Bài viết rất bổ ích tks ad